How to make a playhouse for a cat. Do-it-yourself cat house from a cardboard box. House made for a cat with your own hands from a box
A cat is a rather capricious animal, and it is not so easy to please her. She hates drafts, cannot stand harsh extraneous sounds, smells, and is wary of any rearrangements in the house. Therefore, if you decide to make a house for a cat with your own hands, be sure to consider all her whims. Otherwise, she will simply ignore the new home.
Types of animal houses

There are many ideas for making cat dwellings. It all depends on the amount free space indoors and your taste.
You can build:
- cardboard house
- Soft foam construction covered in fabric
- housing for a cat made of plywood, fiberboard, chipboard or hardboard
- product from old furniture boards, boards and wooden blocks

You will need to choose the shape of the dwelling.
When making a home for a pet, do not forget about the overall interior of the room. If you choose the right fabric for decoration and the shape of the house, it will become a true decoration of the room and fit perfectly into the interior.
Required Materials

The original house can even be obtained from improvised means or materials left after the repair of the apartment.
If you allocate a certain amount for the “construction” of the house and purchase several wooden slats or plywood, as well as soft and durable fabric for covering, you can make an original design design that you will not be ashamed to show to guests.
So, you may need:
- cardboard: if you think that the construction of it will turn out to be too flimsy, then you are deeply mistaken; to obtain a durable structure, it is enough to glue it in several layers
- plywood, fiberboard, chipboard or hardboard: with these durable materials you can even build a multi-storey house or a palace house
- wooden slats: they can be used as spacers when creating a structure, covered with fabric or upholstered with plywood
- PVC pipes and fittings for their connection: they may well replace wooden slats, and the construction of them will turn out to be no less durable
- carpet, felt or foam rubber: they can be useful not only for arranging the couch, but also for covering the side walls
- durable fabric or fur for making bed
- any kind of cat toys for hanging
- wooden block for scratching posts
- hemp or jute twine for her wrap
Do not use highly electrified fabrics for upholstery. They will scare the animal.
Cardboard house
Of course, you don’t have to rack your brains too much and you can also make a house out of a cardboard box by cutting holes in it for doors and windows and throwing a litter on its bottom. By gluing several boxes together, you can get a dwelling from several rooms and even a multi-storey house.
But such a structure will quickly become unusable - after all, it can be quickly torn and even "eaten" during the game.

Still, it is better to make a more durable structure with walls made of sheets of cardboard glued in several layers. Moreover, with a quality finish, it will look no worse than a store product.
Craftsmen from Japan were the first to come up with the idea of making houses in the form of corrugated cardboard beehives for cats. Today, such structures are on sale. But we will make them ourselves, listening to the wishes of our pet.
First, let's decide what shape and size the cat's home will be. If a domestic cat or the cat is still young and full of energy, it would be more logical to create a multi-story structure for them with climbing shelves or attach a real tree with many strong branches next to the house.
For a bumpkin cat who loves to take a nap almost around the clock, a soft and comfortable one-story building with a scratching post attached to it is more suitable. The principle of assembling the house in any case will be the same.

We will describe how to make a simple house for our pet cat in the form of a round yurt or a rectangle of corrugated cardboard glued together in layers.
1 Cut the cardboard into rings or strips and connect them with a stack of PVA glue.
2 To ensure the stability of the structure, cut the bottom out of plywood, fiberboard or chipboard and glue it to the finished house.
3 Using corrugated cardboard, you can make not only a house, but also a couch, a sofa or a bed for your cat to rest. Some cat owners manage to build even scratching posts out of corrugated cardboard. But their lifespan is short. Plus, garbage will always form around it - even thick paper will tear too quickly under the pressure of cat claws.
4 An animal will definitely like a dwelling made of multilayer cardboard. After all, a solid base will turn out to be warm enough, and the walls will be ideally protected from drafts.
If you decide to paint your pet's home, use permanent dyes for this purpose. After all, gouache or watercolor are unsafe - after licking the poisonous composition from the fur, the animal can become seriously ill.
Multi-story plywood construction
If you can keep your pet busy by setting up a play complex for him with ladder shelves, labyrinths, several hanging toys and a scratching post, he may leave your things alone and will not take them to the corners even in your absence.

For its manufacture, in addition to plywood, you will need furniture corners, sandpaper for cleaning cut points, glue, self-tapping screws and furniture corners. It is better to pre-upholster the house with foam rubber, and then with a dense, not too branded fabric.
A piece of carpet will also come in handy - this material is strong enough and will last longer.
Making a game complex in stages

A solid house will turn out from plywood, fiberboard, chipboard. You can also donate a few boards for it - the design will only benefit from this.
So, step-by-step instruction to make it:
1 First, draw a detailed diagram indicating the size of each of the parts. Even if it is quite simple, you should not ignore this stage. It will be a shame if, when joining individual parts, they do not fit in size.
2 Plywood, if desired, can be bent and made from it products complex shapes. For this, frequent blind cuts are made in it. A similar method is used when bending chipboard and MDF. In the future, to strengthen the structure, the resulting grooves can be filled with glue. Curvilinear parts from this material are cut with a jigsaw.
3 You can replace wooden bars water pipes PVC. To connect them, fittings (corners, tees, etc.) are used, which are attached to glue. Pipes must first be degreased with a solvent or alcohol, joined with fittings and marked with a pencil where the glue is applied. It is required to fix the elements motionlessly within 5-6 minutes.
4 To "build" a plywood house with 4 walls, a floor and a roof in which the cat will rest, you will need 6 square or rectangular parts. Such a dwelling is located at the very top of the structure so that the cat can have a greater viewing angle. And the temperature closer to the ceiling is always higher, and there are much less drafts.
5 Cats do not really like closed booths, so provide not one, but a couple of holes in the house. Be sure to treat the cuts with sandpaper so that the animal does not get hurt.
6 Other details of the game complex are selected at your discretion, depending on the inclinations of the animal. To fasten pipes or bars in rectangular or round wooden blanks, you will need to drill holes of a suitable diameter.
7 Paste with carpet or foam rubber not only the sides of the structure, but also the inner surface of the house, so that the animal is comfortable in it.
8 To make the structure strong, use metal corners to connect the parts.
9 Apply a layer of glue to wooden bars or PVC pipes and wrap them tightly with hemp or jute twine, tapping it well to the surface of the bar with a hammer. It will be more convenient for the cat to climb them to any floor.
10 You can dock a miniature springboard to the house, along which the cat will climb up. Do not forget to build an observation deck - animals like to climb up to be able to have a good view of the room.
11 Take care of secure fastening of the house to the wall or floor. If it collapses one day, the animal will treat it with caution and is unlikely to agree to live in it.
The smell of freshly sawn boards or glue-soaked plywood can scare away a cat. Before assembly, they must be well weathered.
We attach a tree to the house
The cat loves to climb the branches of trees. Do not deny her this pleasure, build a device for her from any improvised means - PVC pipes or wooden bars sheathed with jute rope or pasted over with carpet.
You can even bring from the forest and part of a real tree with large knots.

1 To prevent the animal from dragging the bark throughout the house, it must first be cleaned.
2 Carefully sand each of the branches so that the animal cannot be hurt.
3 For the convenience of climbing, attach several viewing platforms to large branches, where the cat can comfortably lie down and observe others. They can be attached with bolts.
4 On one of the branches you can hang a hammock. Stretch its ends well so that the animal can easily climb into it.
It is not worth using leather and leatherette for upholstery of a lounger - cats do not like slippery surfaces that take away heat.
Making a scratching post
Scolding a cat for sharpening its claws is pointless. Indeed, in the wild, when climbing stones and trees in animals, they grind off automatically. In the apartment, they do not have such an opportunity, and overgrown claws interfere with them.
You can protect furniture and door jambs from damage by attaching a wall, floor or hanging scratching post to the house.

Let's describe how to make a house with a scratching post:
1 The most convenient design is a column or rectangle with a height of 9-10 cm. Its width should also be sufficient - from 8-10 cm. At the top of this design, you can equip a comfortable sunbed.
2 The scratching post is attached with furniture corners to a cruciform, rectangular stand, which, in turn, is screwed to the floor.
3 For its sheathing, you can take thick jute twine 0.5-1 cm thick, carpet or thick burlap. Synthetic rope should not be used - catching on its fibers, the animal can damage the claw. The twine is tightly glued to the surface, while tapping with a hammer.
4 As a scratching post, you can use a rug attached to the wall, a carefully sanded log, or even a piece of wood brought from the forest. Before installation, it is necessary to remove all small knots from it and sand it well.
5 Hang a couple of your favorite toys next to her - they will help to attract the attention of the animal.
Housing built into furniture
You can equip a bedroom for a cat in one of the compartments of a nightstand, wardrobe or chest of drawers. After all, even the most sociable animal needs a place for periodic solitude in which it will feel safe.
After all, even if a pet loves to lie on the couch, at the sight of a stranger, most likely he will look for a secluded place.

In the hallway, it is definitely not worth allocating space for the house. It is better to equip it in one of the far rooms, preferably in the one in which the cat is most often. If you are a breeder and your animal is not sterilized, you can also equip a maternity hospital for a cat in ordinary furniture.
To do this, you just need to make a hole in the side wall of the nightstand or closet and build a soft bed from a small children's mattress or an old blanket. If your cat likes to take a nap on a raised platform, give her a place on one of the bookshelves.
To make it convenient for her to climb there, put a small ladder nearby, covered with hemp or jute twine.
Even an old chest of drawers can be turned into a cat play complex. To do this, you only need to remove the drawers, beat the vacant space soft cloth and hang curtains so that the cat can rest peacefully in solitude.
A home for two cats should consist of a couple of rooms or have two floors so that each of the pets has its own place.
house on the wall
Most apartment owners can hardly boast of a large amount of free space. It is not always possible to place even the necessary furniture, what kind of play complexes for a cat are there.
But it turns out there is a way out. A house for her, or at least a sunbed, can simply be screwed to the wall. Such a dwelling is also convenient if there are children 2-5 years old or in the house.

The principle of assembly of the structure is similar to that described above. It can be built from plywood, fiberboard, chipboard or wooden boards. But shields from old polished furniture should not be used for assembly - the animal is unlikely to like to move from shelf to shelf on a slippery surface.
The dimensions of the house, equipped on the wall, we choose arbitrary. To prevent the animal from damaging the wallpaper or painting, you can pre-fix a wooden shield on the wall, and only then hang the shelves.
The scratching post, as well as the rest of the elements of the structure, can also be attached to the wall. Combine a similar game complex with a bedroom by fixing a sunbed or a small hammock on one of the shelves.
Tent from an old T-shirt
Dimensions can be arbitrary. The most important thing is that the animal in it should not be too crowded. A similar structure with a wire frame can be easily moved and put in another place.

1 Make the bottom of the tent from a piece of thick cardboard or plywood. To prevent the cardboard base from sagging, glue or tape together 2-3 sheets.
2 To make the frame, you will need two pieces of thick wire. They will need to be bent into arcs.
3 We connect them together so that the ends are located in the same plane. The upper part of the frame, in the area of the crosshairs, secure with tape.
4 To attach the frame to the bottom of the house, we make four holes in the corners of the cardboard or plywood blank. From the edges it is necessary to retreat 3.5 cm.
5 After pushing the wire into the holes, its ends must be bent from the back of the bottom and secured with adhesive tape.
6 The mouth of the T-shirt will serve as the inlet of the house. Roll up the bottom and sleeves. It can be simply sewn on by hand, but since the T-shirt will need to be washed periodically, it is better to pin the bottom with pins under the bottom of the house.
7 A soft tent for a pet can also be sewn from felt, knitted or other types of fabric. Make a pattern from a newspaper, attaching it to a wire frame. Be sure to leave seam allowances when cutting.
Soft couch
For sleep, cats most often choose soft pillows, sofa backs and other places that are convenient from their point of view. But it is in these places that the most a large number of wool. You can solve the problem with a small soft couch.
It is better to use natural fabric that will not be electrified - linen, cotton, wool. The filler can be batting or synthetic winterizer.

You will need to cut out a cushion-lounger, sidewalls (we will fill them with soft filler in the future) and carrying handles. Make a small indentation in one of the sides - it will be more convenient for the cat to enter and exit through it.
In order for our design to take shape, attach a sheet of cardboard to the bottom.
Hanging couch can be fixed on the battery - after all, cats are constantly striving to take a warmer place. For the manufacture of the frame of such a product, you will need a very strong wire.
The cover is sewn from two pieces of fabric. Wrap the hanging parts of the frame with a cloth or twine. If the fabric bottom of the lounger sags a little, it's okay - if its bed resembles a hammock in shape, the animal will only be happy about it.
A cozy place for a pet can be equipped even from an old stool, upholstered in its sides first with chipboard or plywood, and then with thick fabric or carpet. Prepare a shelf in it, which will serve as a sleeping place.
Do-it-yourself cat house. Game complex
PHOTO GALLERY
8.1 Total Score
Conclusion
For us it is very important Feedback with our readers. Leave your rating in the comments with the reasoning behind your choice. Your opinion will be useful to other users.
Ease of implementation
Convenience
Originality
|When talking about interior design, they mean the design of a room for people. Pets are content with simple baskets and carriers. Their owners are forced to endure animal pranks in the form of torn curtains and scratched furniture.
However, cat lovers can take care of the pet and prevent an unpleasant situation with damage to property. To do this, you need to arrange for the cat his own habitat in the form cat house.
You can build a home for the cat yourself. Product design to fit the overall interior of the room.


Material selection
You need to choose materials based on the following principles:
- Security. The house should not have sharp protruding corners, small parts, protruding threads. Nothing that a cat could swallow or injure a paw on it.
- Quality. Housing for a cat should be created exclusively from natural materials. It is important to use non-toxic glue or paints.
- Hygiene. The cat's habitat should be easy to wash and disinfect.
plywood house option
Required tools and materials:
- Sheets of plywood.
- Furniture corners.
- Carpet or other dense upholstery.
- Foam rubber.
- Sandpaper.
- liquid glue.
Production order:
- 6 identical squares are cut out of plywood.
- Holes are cut in two squares so that the cat can enter through them.
- 5 identical squares are interconnected, creating a house without a roof. All details are fastened with furniture corners.
- Carry out the interior upholstery of the structure. To do this, with the help of glue or a furniture stapler, a layer of foam rubber is laid on the bottom. A carpet is placed on top of it. Exterior walls are finished with the same material.
- The entry holes are treated with sandpaper to avoid injury to the animal during entry and exit.
- From above they cover with a roof, fastening the structure with furniture corners.

The external design of the cat house is carried out in accordance with the general interior of the room. You can finish the structure outside with carpet. Paste over with self-adhesive wallpaper to match other furniture. Or paint in accordance with the walls of the apartment.

A scratching post is installed next to the house, protecting furniture and curtains from damage.
Wood and plywood option
Required materials and tools:
- Plywood sheets, density 6 - 12 mm.
- Wooden boards, weathered.
- Rope.
- Wooden pole. Diameter 5 - 10 cm.
- Upholstery fabric.
- Sintepon.
- PVA glue.
- Self-tapping screws, small nails.
- Electric jigsaw.
- Hacksaw for wood.
- Knife.
- Screwdriver.
- Tassel.
- Pliers.
- Ruler.
A house with two entrances, a viewing platform and a scratching post

Stage one. cutting
- Draw drawings of a cat house. The drawing is transferred to prepared plywood sheets.
- With an electric jigsaw and a hacksaw, the base, parts and platforms are cut out of plywood.
- Saw off wooden sticks of the required height.
- They cut pieces of foam rubber, synthetic winterizer, carpet for finishing all surfaces.
Stage two. Fasteners and assembly
- Parts of plywood and wood are glued together. The structure is fixed with screws and nails.
- Fabric and foam parts are securely glued with PVA glue. It is applied with movements from the center to the edges.

We assemble the parts of the structure. Subsequence:
- Prepare the base. A column with a viewing platform is fixed on it.
- Collecting a house. The glued side is turned inward.
- Fabric trim the surface on top and sunbed.
- Installed on the base, fix the entire structure with glue.
The claw point is done like this:
- The wooden column is securely coated with glue.
- Carefully wrap with a rope, without making gaps and gaps.
- Leave the design for two days to dry.
- In a dried and well-ventilated house, a replaceable bedding mat is covered.

Option with a high observation deck
- Determine the parameters of the future house. Based on the results obtained, six squares are cut out.
- Round holes are made in two boards. This will be the main entrance and the back entrance.
- The inner walls are upholstered with material, under which a foam layer is placed.
- Using furniture corners, connect the walls like a cube.
- The pipe for the observation deck is well coated with PVA glue, the rope is tightly wound.
- Cut a square or rectangle out of plywood. On the one hand upholstered with foam rubber. Then decorate with fabric on both sides.
- The observation deck is attached to the pipe using furniture corners.
- An almost finished house for a cat is upholstered with furniture fabric. A pipe with an observation deck is attached to the structure.
- If desired, the owner can attach a hanging toy from below the observation deck.

The option of a cat's dwelling with an observation deck installed at a height is possible only if the entire structure is securely fastened. An unstable house during use or play can roll over and injure the cat. When creating a home for a cat on your own, you should take care of the complete safety of a four-legged pet.
You can save money by using used upholstery or by using old foam rubber.
Important Notes
- Before starting work, be sure to draw a design diagram. This will allow you to cut the material as accurately as possible, avoiding damage and inaccuracies.
- New building material (boards, plywood) should not emit odor. It is necessary to let it stand so that all third-party odors disappear. Cats are very sensitive to foreign odors. A pet may refuse a dwelling that exudes an unpleasant odor.
- Use only PVA glue. It quickly weathers, dries well, does not release toxins into the surrounding air.
- For upholstery use natural or synthetic fabric. The main thing is that it is not electrified. Silk is not suitable for upholstery, threads from this material.
- Bare metal parts are not allowed in the structure. From the friction of the cat's fur, a weak electrical discharge is formed. Metal is a good conductor of current (albeit a weak one). It may harm the animal. In addition, pet hair can cling to metal elements.

A pet must have its own resting place. There the cat will be able to retire and fully relax. To organize such a corner is the responsibility of every cat owner.
Domestic cats need an individual corner where no one will disturb their sleep. The decision to equip a comfortable place to relax with your own hands is very practical. In this case, all the nuances of the situation are taken into account and characteristics animal. The proposed master classes with step-by-step instructions, accompanied by a photo, will help you decide on the optimal model of a cat house.
Conditions for the correct equipment of the pet house
The initial stage of any creative process is planning. When designing a house for a cat, you should take into account a lot of nuances, which we will talk about in detail.
Shape, size and color
Among the variety of designs, the most common are beds and houses with a scratching post, the best solution is to combine both options. When arranging a closed model, preference is given to rectangular shapes, although round houses periodically appear in the photo. Two factors influence the choice of design dimensions: the size of the cat and the presence of free space in the room. If you are the owner of two or more animals, you cannot do without a game complex. Cats are hunters by nature, so they will appreciate a house with two exits, which is very convenient to keep an eye on a potential enemy.
A wide range of finishing materials allows you to choose a fabric that will be in harmony with the overall interior and at the same time have sufficient strength so as not to tear during the operation of the cat house.

materials
The material for the house is selected depending on the planned model. Let's take a look at the most common solutions:
- The frame of a game complex or a single closed structure is usually made of chipboard. A detailed master class of this option will be offered later. Plywood, MDF or natural boards are also suitable for this purpose.
- Original models of cozy houses, with certain skills, can be woven from vines or newspaper tubes with your own hands.
- Owning a needle and thread will be enough to build a cozy bed for a cat or a soft house made of foam rubber.
- Extremely simple in execution closed and open houses for cats from boxes.
- For do-it-yourself decoration, scratching posts are stocked with jute or sisal rope. Avoid fixing the material with nails or staples, cats can be injured on such a device.
- The basis of a cat scratching post is usually PVC pipes, sometimes metal products or wooden bars are used.
- Sintepon, foam rubber, artificial straw are suitable as fillers for pillows and sailors.
- The inner lining is made of soft fabrics: plush, fleece, artificial fur will be most welcome for a cat.
- The external decoration of the house is selected taking into account the cat's habit of tearing its claws. Therefore, in a capital structure, the material must be strong enough. The carpet fully satisfies the requirements, provided that there are no electrostatic properties.
Advice ! When studying any master class, please note that do-it-yourself construction for a cat is carried out using natural materials.
An important point is the choice of glue, it should not exude a pungent odor that will scare away the cat. Give preference to products containing an organic solvent.
The photos below show the wide the lineup houses that you can decorate with your own hands:


Accommodation
The key condition for the correct placement of the cat house is the stability of the structure. Therefore, for gaming complexes, it is desirable to take care of the base of fiberboard. Another nuance is the level of installation of the house. Cats prefer to watch what is happening from above, so when designing it is better to plan its location at a height of 1.0-1.2 m from the shelf. Beds, hammocks and just coasters are also preferable to equip at different levels.
Arrangement of a compact design with a scratching post
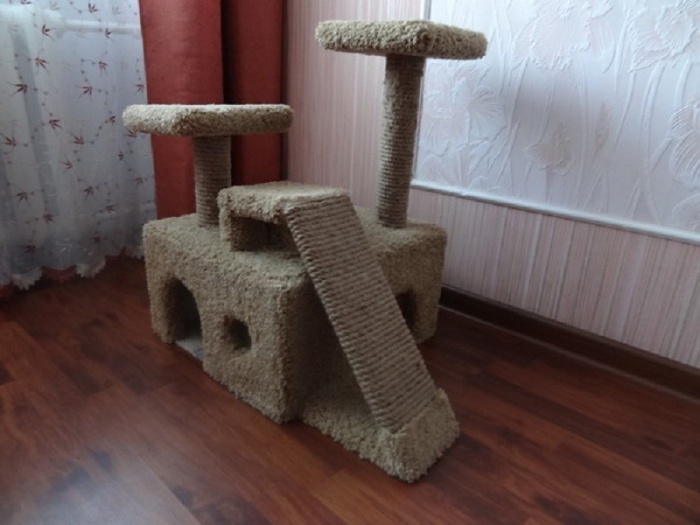
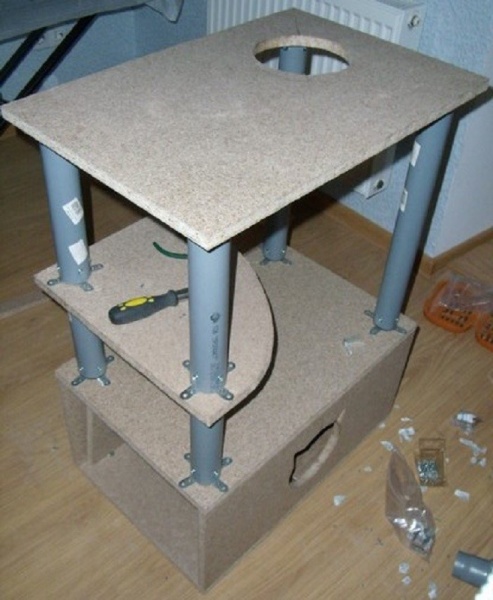
The compact design of the house with a scratching post, a stand and a toy on a rope will harmoniously fit into the interior of a small room. Additional elements allow you to organize for the cat not only passive rest, but also active pastime. A photo of the finished design will help to more specifically understand what will be discussed in the future master class.

Preparatory stage
Before you start creating a convenient mini complex with a cat house with your own hands, you should take care of the following materials:
- For the base of the house - a fiberboard board measuring 40x120 cm.
- On the roof - chipboard 44x60 cm, walls - fiberboard 44x55 cm.
- Spacers for the walls of the house are made of 7 rails 38 cm long with a section of 3x4 cm.
- The base of the scratching post is a PVC pipe Ø 110 mm, 60 cm long, the winding is made of jute rope.
- The inclined scratching post is made of a board 40x18 cm.
- 2 wooden beams will help to ensure the stability of the scratching post near the house.
- The basis of the couch is fiberboard, chipboard and foam rubber with dimensions of 44x30 cm.
- Upholstery fabric for decorating a house, a couch and an inclined scratching post.
Building a structure for a cat with your own hands is impossible without the following tools:
- Jigsaw (preferably electric) and saw.
- Screwdriver with drill.
- Scissors and sandpaper for grinding the details of the house.
- Hot glue gun and furniture stapler.
- Pencil, marker, chalk and tape measure.
Manufacturing process
A detailed master class will help you competently organize the workflow of creating a do-it-yourself mini complex for a cat with a house, a scratching post and a bed. So:
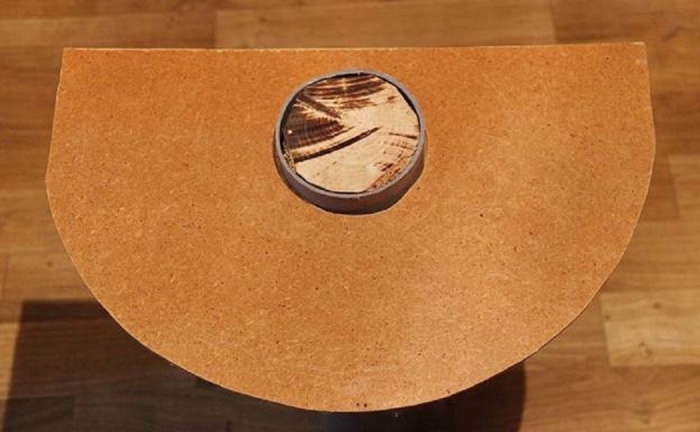
- Rectangular elements are initially cut from chipboard and fiberboard according to the dimensions indicated in the previous section. It is not necessary to strictly adhere to the proposed dimensions, you can independently determine the optimal outlines of the cat house.
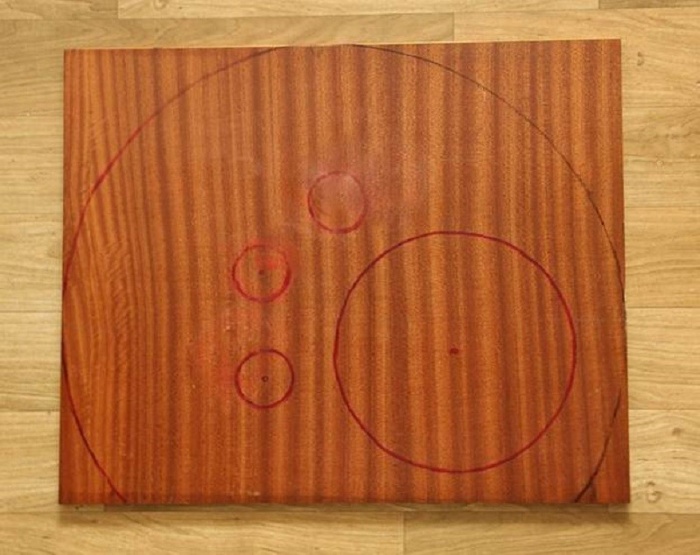
- A circle with a radius of about 27 cm is marked on both parts. It is better to do this with a compass, in its absence, use a marker attached to a rope.
Remark ! The center of the circle is shifted down to ensure the stability of the cylindrical house structure.
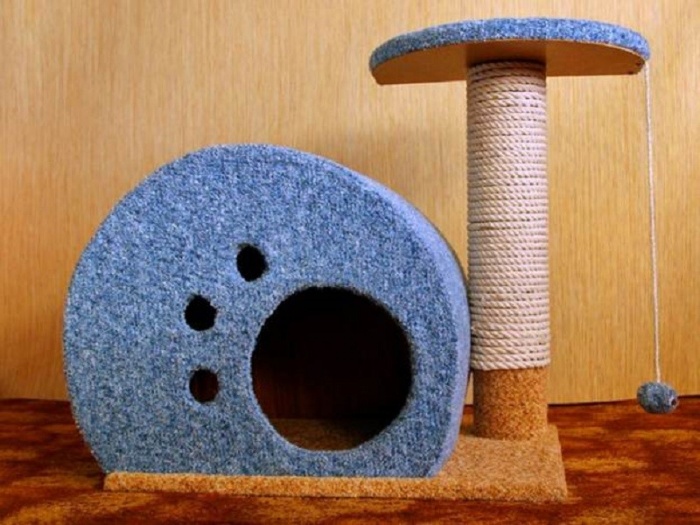
- The back wall will remain solid, on the front they draw an entrance hole with a diameter of 22 cm and small windows Ø 5.5 cm, as shown in the following photo:
- The next step is cutting holes with your own hands. To do this, you need a jigsaw and a drill.
- Further, both parts of the future cat house are combined to make marks where the slats will be fixed. It is recommended to install about seven spacers. It is practical to make marks by through drilling on two walls, as shown in the photo:
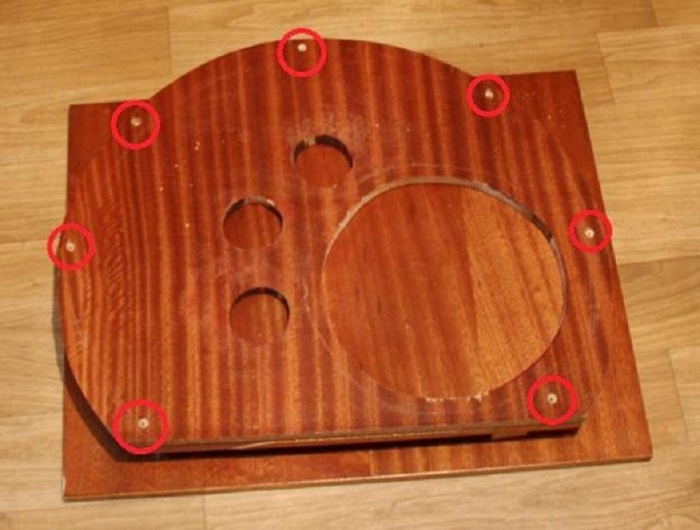
- In the holes with a drill, recesses are prepared for self-tapping screws, with which the rails will be fixed.
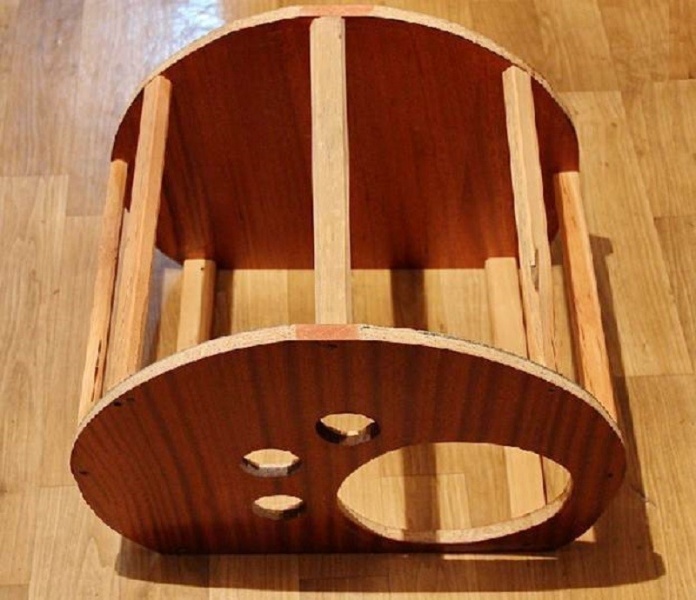
- Reiki for the cat's house need pre-treatment: after planing, the edges are leveled and roughness is removed. The thickened bottom rails will provide the cat house with greater stability.
- The front and back parts of the structure for the cat are connected with rails using self-tapping screws, look at the photo, what should be the result:
- The next stage is cutting the material for decorative finishing of the structure.
Advice ! It is better to choose a fabric for a house with a cut pile, otherwise the cat will cling to it with its claws. Faux fur, plush or pile are also suitable for this purpose.
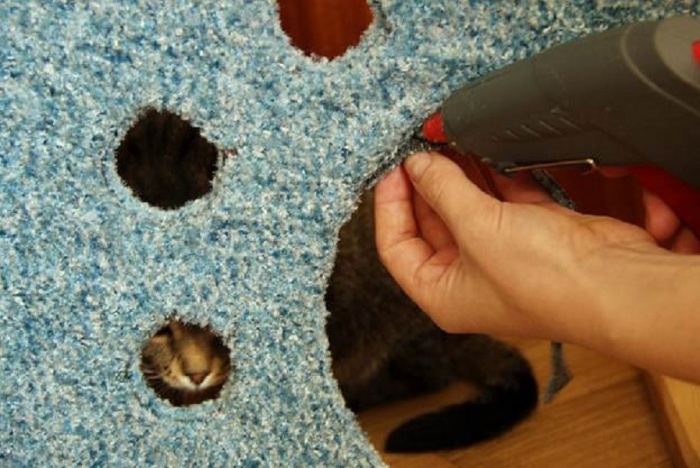
- The most practical way to attach a decorative finish to a house blank is with the use of a thermal gun filled with glue without a strong odor. On the front side, you will need to carefully cut out the openings for the entrance and windows and process the edges.
- The place on the base of the chipboard, where the house will be fixed, is made out with foam rubber. Its dimensions correspond to the dimensions of the structure for the rest of the cat. A circle is drawn next to where the frame of the cat scratching post will be installed.
- The entire base is decorated with decorative material. It is convenient to do this with a furniture stapler. Having wrapped the fabric, the bottom of the base is covered with a sheet of fiberboard.
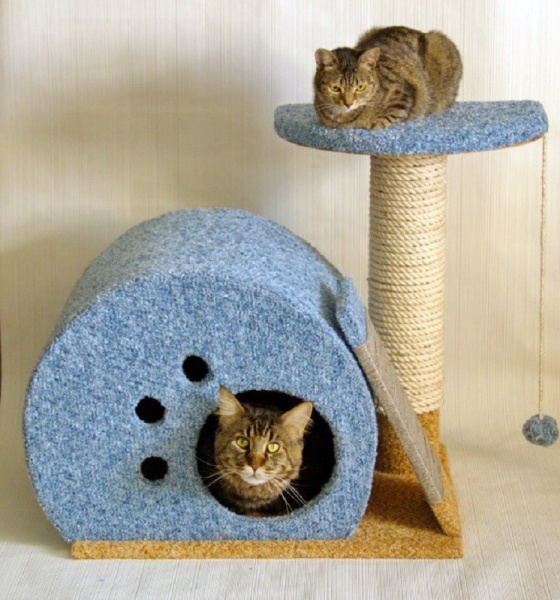
- Now you can proceed to the processing of the roof of the house. First, the upper part is glued, then the slats located below inside the structure are closed. After that, the cat house can be mounted on the base, after selecting the correct size of the screws. The following photos clearly show the interior design of the house and the satisfaction of the cat with the process according to the proposed master class.


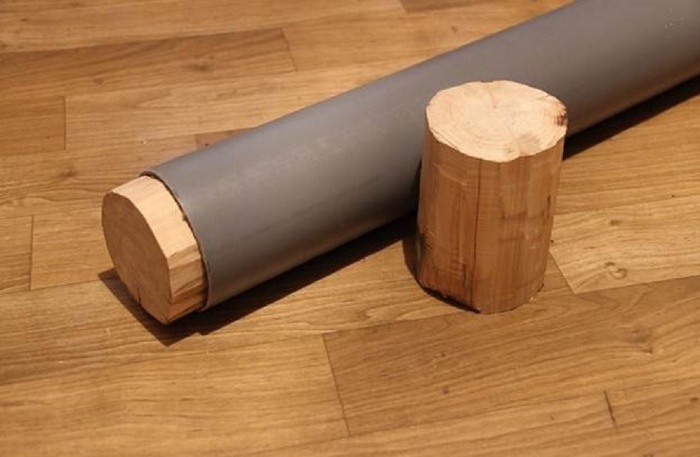
There is very little left. For the stability of the plastic pipe, wooden bars are placed inside on both sides. Depending on the materials used, they are fixed with screws or glue. Semicircular elements are cut out of chipboard and fiberboard for a cat bed. First, a fiberboard part is strung on the pipe (later it will close the edges of the decorative finish).
Then a piece of chipboard is attached to the beam. Having given the structure of the cat house a horizontal position, the place of fixation of the scratching post is determined, as shown in the following photo:

After that, the pipe is connected to the base of the cat house. Final touches:
- fasten a cord for a hanging toy under the part of the chipboard bench;
- sheathe a cat bed with a cloth, having previously laid foam rubber;
- connect with glue to the bottom part of the fiberboard;
- decorate the pipe with jute or sisal rope with periodic fixation with glue;
- an interesting bubo made of soft fabric is attached to the edge of the hanging cord.
This is how the house for a cat with a stand looks like now, it remains to make an inclined scratching post with your own hands.
On the one hand, a diagonal cut is made on the board for stable fixation on the basis of the cat structure. The edges of the board can be sheathed with cloth, and the middle wrapped with a rope. After that, the upper edge of the claw point is attached to the rail of the cat house, and the lower edge to the base. This master class with step-by-step instructions for decorating a mini complex with a house is completed. You can supplement it with your own elements or change the dimensions, the main thing is to ensure the strength and stability of all components.
Decoration of the play complex
The production of a multi-level play complex will require a lot of time and effort, but positive emotions from the result will be experienced by everyone - both the owner of the cat and the animal itself for which it is intended. The step-by-step instructions offered in the master class, and numerous photos will help you navigate in the right direction and arrange a practical corner for the cat without unnecessary difficulties. Materials for such products are taken standard, door hinges may seem like an innovation.
Assembly
Let's move on to the process:
At the first stage, a box of arbitrary sizes is assembled from chipboard sheets (without one side wall), in our case, a spacious cat house is 80 cm long, 55 cm wide, 30 cm high. design with individual features, you can cut out the likeness of a cat's head. The assembled frame of the house is attached to the base, as shown in the photo:

Hinges are attached to the free side part and the door is fixed. Pipes are fixed on the house with corners with screws.

By alternating pipes with chipboard panels, you can create a play complex for a cat of any design with a different number of levels with your own hands.
Remark ! For convenient movement of the cat, holes are formed in the panels.
The photo shows that above the house between the two pipes there is a bench, then there is a continuous overlap.
The next level is again a couch, but of a different shape. It will be interesting for a cat to move between the houses on the stairs, which can be installed on the side or directly inside the complex. Furniture corners are also used for its fastening.

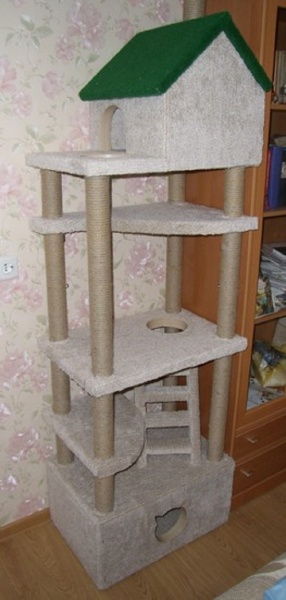
It is better to decorate the upper house with a gable roof, install it symmetrically on four pipes.
Advice ! By fixing one part of the roof on hinges, you will greatly facilitate the process of cleaning the house.

To give greater stability to the structure, a transitional shelf between the house and the closet will help, which additionally fixes the multi-level complex for the cat.

Finishing
After the assembly process, proceed to the decorative finish. First, all pipes are wrapped with a rope made of natural materials, at the top they are fixed with glue. Beds, ceilings and houses are pasted over with carpet. On individual elements, you will need to make holes for pipes. Corners and hard-to-reach areas are recommended to be fixed with a furniture stapler.

Do-it-yourself decoration can be done in one color or combine finishes. Particularly careful approach requires the processing of ends and joints. It is convenient to close the area of the holes with furniture strips, which are easy to deform and provide a smooth surface that is unable to injure the cat. On this master class can be considered completed. Despite the voluminous work, the step-by-step instructions will become reliable assistants in a noble impulse to create a do-it-yourself play complex for a cat.
Conclusion
The proposed master classes will not do without male hands. If they do not want to participate in the process, it is better to stop at making models of houses with their own hands, which require exclusively female skills. For the most elementary transformation of a cardboard box into a cat's favorite resting place, you will need scissors and adhesive tape. You can sew a simple bed with your own hands from foam rubber and soft fabric in a couple of hours. Therefore, when choosing a design for a cat, consider your capabilities and the availability of free time.
Reading time ≈ 5 minutes
Cats are very fond of outdoor games, jumping on shelves and climbing curtains. But after their games, the owner has to transplant flowers from overturned pots, re-paste wallpaper and collect fragments from dishes. Make a playground with a house in the form of a kind of “tree” for your fluffy pet, and there will be much less problems. We will tell you how to make a house for a cat with your own hands from simple materials.
Preparation for work
Prepare the following tools and materials:
- pieces of wood, plywood or fiberboard;
- thick cardboard tubes or plastic plumbing pipes with a diameter of about 7 cm;
- 4 wooden sticks with a diameter of 3 cm;
- upholstery and foam. To create a playhouse for a cat, some old fabric such as plush will do;
- construction stapler with staples;
- twine and hemp rope;
- screwdriver, scissors, saw, jigsaw;
- sandpaper, drill, screwdriver.
In order for a cat house to please a fluffy pet with your own hands, carefully consider its design and dimensions. Make the design solid and durable, as well as safe for the cat. You do not want the cat to be crushed during the games with the house.

Make a diagram and draw drawings of the future gaming complex. Without them, you will not calculate the amount of material. For this, they are used different programs or a plain sheet of paper with a pen and pencil.
Woodworking
1. Working with basic parts. There are two main parts - a rectangle 55x40 cm and a square 30x30 cm. Cut out the details of these sizes from wood with a jigsaw. In the rectangle, make three round holes - two on one side, and one on the opposite side, with a diameter of 3 cm (see drawing). That is, the holes should be similar to the diameter of the wooden sticks that will hold the entire structure. Make holes up to about half the thickness of the wood, they should not go through. Check out the photos and videos in our article and you will understand how to make them. In the square, make one hole in the middle in the same way. Treat the details with sandpaper.


2. Manufacturing upper parts. These parts will be on the "top" of a kind of "tree" in the game complex. Cut a circle about 40 cm in diameter on a piece of wood. Make the same second circle. In the middle of each part, cut a hole as indicated above - up to half the thickness of the tree.

3. Manufacture of rods. wooden sticks that you have prepared will hold the entire structure. But they need to be cut to the appropriate length. The length of the shortest rod is 85 cm, the tallest stick is 173 cm, and the other two should be 120 cm each. Prepare wooden sticks of this size. Use a file or jigsaw. You will then place these details in the holes of the main parts of the house.

4. Processing of the middle parts of the house. The main pieces will be the top of the cat house, with other pieces of wood in between. They can be made in the form of rectangles or other shapes. They also need to make holes on the sides or on one side. It all depends on your house design.


Upholstery of house elements and preparation of pipes
The next stage in the work is a master class on the upholstery of wooden elements: and the preparation of cardboard tubes.
Engage in upholstery of round elements - the upper parts of the house. Cut out a large piece of fabric to cover the entire side of the wooden disk. In addition, cut out a circle from the foam rubber. Lay the cut fabric face down on the table and place the foam rubber in it, place a wooden disk on top. Staple the fabric to the wood with a stapler. Do the same for the second round.


All other wooden elements of the house for a cat also need to be upholstered with material and put foam rubber in the middle.

Prepare cardboard or plastic pipes. The holes inside them should be larger than those of wooden bases. Stick wooden sticks inside the cardboard tubes, this is necessary in order to make the structure more stable.


The next step is laborious - wrap the pipes with hemp rope or twine. To do this, spread the pipe with glue and wrap it with a rope. Let the pipes dry.


Making elements of a cat house
The size of the cat house can be different. But it has six parts:
- two sides;
- top part;
- rear end;
- front with door.

Make the elements of the house out of wood and upholster the structure with material. Connect all elements with thin nails at the borders.


Instead of upholstery, you can paint the house, pre-treating the wood with a primer.


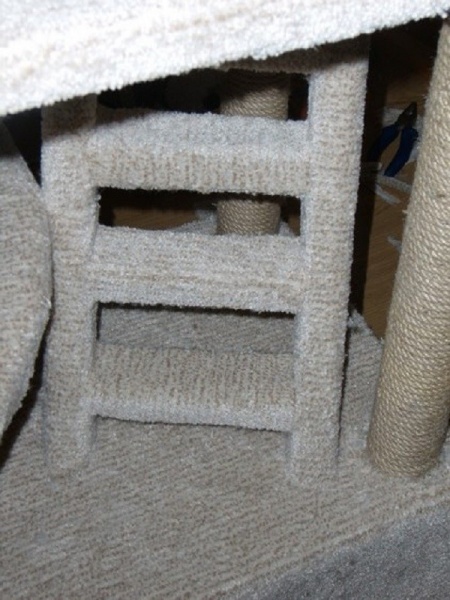
From pieces of wood, make a ladder along which the cat will climb up. You can wrap the steps of the stairs with twine, and you will get a cat scratching post, because the animal will sharpen its claws on the stairs.


Connection of elements of the game complex
Connect all the elements into a single design. Insert the columns into the main parts. Attach the house itself and all other elements to the posts wrapped with twine using screws, self-tapping screws, metal corners. Shelves adjacent to the walls can be attached with corners or on the console to the wall.


Pets, just like people, sometimes want to relax and have their own corner in the apartment, where no one bothers them. Cat owners often notice that their furry friends are always trying to hide in some box, box, climb under an umbrella or on a table. Watching this, you should think about how to make a house for a cat with your own hands, where she can feel calm and protected.
Do-it-yourself cat house projects
Not to spend a lot of money, as well as to make a very original home for your pet, fantasy and improvised materials will help.
How to sew
A fabric cat house is one of the most quick options manufacturing
To make a fabric house, you will need the following materials:
- Two pieces of fabric measuring 200x60 cm (one of them should be denser, because it will be used for the inside of the structure).
- The foam should be the same size as the fabric.
- Draw a house template on the newspaper. Its dimensions can be 40x40x25 (width, height, roof slopes, respectively). The bottom will have a size of 40x40 cm.
- Cut out all the walls from one piece of fabric. Do the same with the other piece of material. Thus, you should get 8 wall elements and 2 bottoms.
- Using foam rubber, according to the template, cut out 4 walls and a bottom.
- Place foam rubber between the obtained pieces of fabric and sew the material around the perimeter.
- Connect all the details of the house with a strong seam.
From a T-shirt
The advantage of this type of house is that you can choose a T-shirt of any color that fits perfectly into the interior.
An old T-shirt is also suitable for a house. In this case, another piece of thick cardboard and strong wire will come in handy:
- Bend two pieces of wire into arcs.
- Using an awl, poke holes in each corner of the cardboard base through which to push the wire and bend it with pliers.
- Put the structure on the floor and check its symmetry from all sides.
- Pull the T-shirt over the frame so that the neckline is almost level with the bottom. This will be the entrance to the house.
- Sew the edges and sleeves of the thing so that the “cover” moves as little as possible.
From a blanket
The blanket house is very cozy and does not take up much space.
From an unnecessary, thick blanket, you can build a home for your cat in a matter of minutes. To do this, it is enough to carefully sew a snake on both sides of the fabric. When it is fastened, the house will be ready. If you unfasten it, then the animal will be able to lie on the blanket and not hide from anyone.
Suspension
Even a child can make a hanging house for a cat with their own hands
You can make it from a pillow or a piece of fabric (in the latter case, you will need a piece of plywood to make a bottom out of it). Hammer the anchor hook into the ceiling, hang the house to it and launch the cat into it.
If you use a pillow, then it must be wrapped with soft material and sewn in several places. Attachment to the hook occurs by tying the ends of the fabric.
From a stool
A stool house is the simplest home option for your pet
In this case, sew a cover on the stool. The bottom can be made of cardboard or plywood. Put the fabric on a stool, not forgetting to make an entrance. So you get not only a finished house, but also a comfortable roof on which the cat can always lie down and relax.
How to tie a house
Knitted house - one of the most budget options housing for cats
With the help of a hook and thick yarn, a round house is most often knitted. They begin to knit the product with double crochets in the form of a round napkin. Having tied up to the desired size, their number is gradually reduced. Continue knitting, making the walls of the housing. Having decided on the height, the number of loops is again reduced, making the roof. To make an entrance to such a house, it is necessary, having chosen its location, to make air loops during the knitting process, which will subsequently also be tied with double crochets.
Such a dwelling is one of the most popular, because it does not require special skills and material costs.
It is necessary to choose a cardboard box taking into account the size of the animal
To create a cardboard house you will need:
- Cardboard box (preferably thick).
- Soft fabric, pleasant to the touch.
- Scissors.
- Stationery knife.
- Adhesive odorless.
- Masking tape.
Dimensions and drawings
As a result of the fact that it is very easy to work with cardboard, there can be quite a large number of options for a house from it. Basic size requirements:
- The height is at least 40 cm, so that the animal can not only lie down in its new home, but also sit.
- The total area depends on the size of the cat. The minimum dimensions are 40x50 cm.
- The entrance also should not be too small, because the pet should be able not only to climb through it, but also to slip through if necessary. Therefore, it is better to make a hole of at least 20 cm. If desired, one wall of the box can be cut out almost completely to leave a free passage (in this case, the house is more suitable for a cat than for a cat).
A reliable design can be obtained if you follow certain instructions:
- Having decided where the entrance to the house will be, according to the drawing, draw a circle on one of its walls with a pencil. Using a utility knife, cut out the entrance, making sure that the animal can easily climb through it.
- Glue absolutely all joints with adhesive tape to make the structure more reliable.
- To give the structure a complete, aesthetic appearance, make an outer “upholstery” for it with glue and fabric on its outer side. Glue a single piece of fabric on the wall with the entrance, in which then cut the necessary hole. At the same time, it is important not to forget to leave some material for allowances, which will need to be wrapped inside the structure and glued.
- Lay a soft piece of fabric, foam rubber sheathed with durable material, or a small piece of plush on the floor.
The ideal bedding option for a cat in a house - a flat pillow in size
You can only let the cat into its new home when the glue is completely dry.
If you want to make the house very durable, you will have to cut out all the components of the structure from cardboard. Each element must be duplicated. After that, glue them together. You can also connect all the components with masking tape, gluing the joints inside and out.
From plywood or chipboard
A house made of plywood or chipboard is a really strong and reliable structure, which it will be quite difficult for a cat to destroy.
Necessary tools and materials
A house made of plywood or chipboard is the most difficult option for making a cat's home.
To build housing for your pet at home, you need to have:
- Plywood or chipboard.
- Roulette, pencil, ruler.
- Electric jigsaw.
- Drill.
- Screwdriver.
- Construction stapler.
- A hammer.
- Glue gun.
- Scissors, knife.
- Wood saw.
- Upholstery fabric.
- Wooden post (its length can be 50 cm or more).
- Hemp rope.
- Self-tapping screws, nails.
- Furniture corners.
- Sandpaper.
Dimensions and drawings
If your cat has an average size, then the size of her house will be as follows:
- Height not less than 40 cm.
- The length and width are the same - also 40 cm.
- The entrance must have a diameter of at least 15 - 20 cm. In this case, it is important to take into account the physique of the animal.
Drawings of houses made of plywood or chipboard are very diverse. They may have a flat roof, two or more slopes. In this case, it is worth considering whether you will have an additional bed for the animal. If such an element is not provided for in the drawing, then it is better to make a roof with a sunbed, where the cat can relax and observe others.
Step by step instructions for making
According to the outlined drawing, they begin to make a home for a cat in the following sequence:
- Transfer all measurements from the drawing to plywood or chipboard using a ruler and a pencil.
- On one of the walls, immediately draw a circle that will serve as the entrance to the house. It can also be made square, rectangular, in the form of a cat's head.
- Using a hacksaw or jigsaw, cut out all the components of the structure.
- Sand all edges of the cuts with sandpaper to get perfectly smooth surfaces.
- From the fabric to make upholstery for the walls, ceiling and floor with a minimum number of seams. Glue it or nail it with a stapler to all the components of the home.
- Connect all the walls of the structure with corners, except for the outer one.
- Using the corners, attach the finished structure to the bottom of the future house.
- Assemble the roof using nails and screws. Attach it to the finished home.
- Upholster the interior with a single piece of fabric. When the design of the house with the material is fully completed, attach the outer wall to the entrance.
- Glue the wooden post to the roof and fasten with self-tapping screws for additional rigidity.
- Wrap the column with a rope in a circle (it will act as a scratching post), gluing its end to the tree first.
- From a piece of plywood, cut out a platform of the required size. Using a stapler, attach a suitable fabric to it, under which you can lay a piece of foam rubber.
- Attach the resulting sunbed to the pole.
Features of the houses
Sometimes cats can peacefully coexist in one small house.
Before building a home for a cat, you need to know what are the main requirements for them:
- The house must be stable.
- Study the habits of your pet, notice at what height he most often likes to spend time (on the floor, on the sofa, closet, chair). So you can determine at what level the future structure should be located so that the animal wants to be in it.
- Any foreign smell in the house should be absent, otherwise the cat will not want to sit in it.
- Housing should not be too cramped and small.
- To prevent the cat from spoiling the house with its claws, it is recommended to install a scratching post in it or next to it.
In addition, during construction, gender differences of pets must be taken into account. So, if you are building a house for a cat, it is better to place it at a certain height from the floor so that he can jump into it. This will make him feel safe. It’s good if the building is comfortable, because cats quite often like to spend time watching others.
As for the cat, she makes much more demands on her house:
- The presence of not only the main, but also an emergency entrance. This condition must be observed if the cat has kittens. In case of danger, she can always save offspring.
- A large cat bed is not needed at all. She prefers that there are at least two viewing platforms near her house, located at different levels: from a height she watches everyone, and from below she prepares to jump on prey or protects her kittens.
- It is better if the sunbed is not located on the roof, but at least a short distance from it.
If you have two cats in your house, and they live together, there may be one house for them. At the same time, it should have two "rooms", which are best placed at different heights. The number of sunbeds should also be doubled so that the animals do not drive each other away.
House with several rooms and passages is ideal for several cats
In the event that you are going to make a home for a pregnant cat, take care of the following:
- It must be quite large.
- It is better to upholster its inner surfaces with waterproof material, which will allow you to wash your home when necessary.
- Place the structure near the battery so that the kittens are warm in it.
- The entrance must be very wide so that a large amount of fresh air, necessary for babies, can penetrate through it.
- In order for the cat to feel comfortable in such housing, the entrance is hung with a curtain.
- At the bottom of the house lay foam rubber, sheathed with a soft cloth. On top of it in the first few days after childbirth, add disposable diapers. After 3-4 days, they can be replaced with ordinary pieces of fabric that can be easily washed and replaced.
- Put her favorite toy in it.
- Put it in the place where the cat likes to rest the most.
- Bring the cat into the house, sit next to her and pet her. Give treats while she's in it.
In order to accustom a cat to a new house, you can use special sprays that attract animals with their smell.
Your cat will definitely love her new house if you help her a little to stop being afraid and beware of it. For this you should:
House made by hand - The best decision for your pet. This way you not only save a significant amount of money on the purchase of a ready-made structure in the store, but also create housing according to the preferences of your pet.